Yield: 6 strawberry matcha buns // Total Time: 2 hr. 10 min. // Disclaimer: This post includes affiliate links.
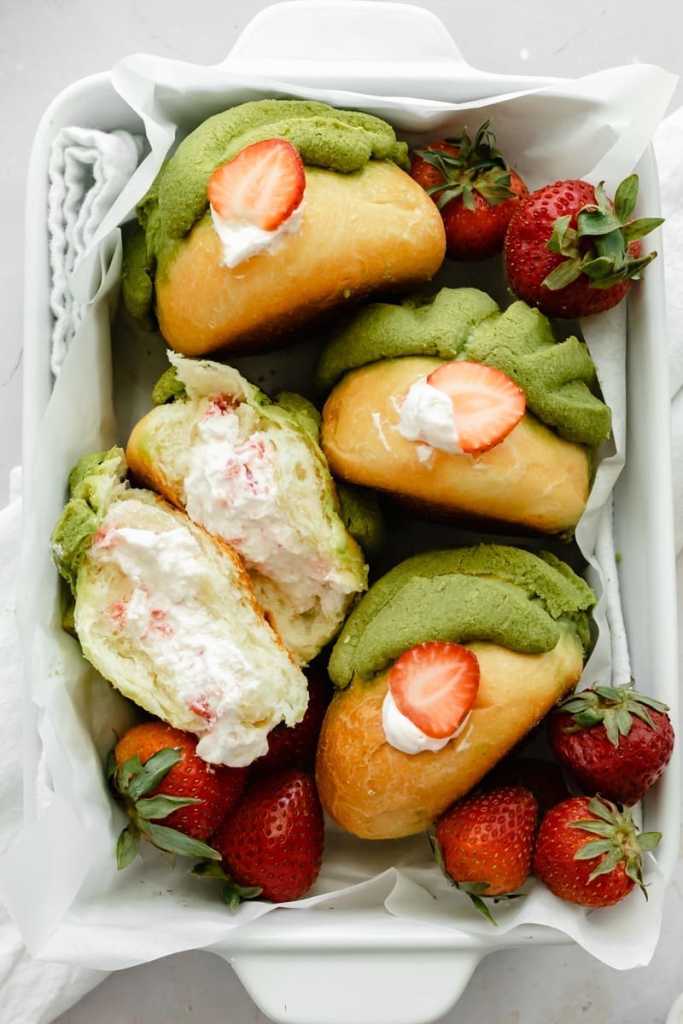
Strawbery and matcha: an amazing and classic pairing. But what if we turned that pairing into a delicious dessert? These strawberry matcha buns feature the lightest and fluffiest brioche buns, are topped with a matcha streusel and filled with a fresh strawberry whipped cream!
Strawberry matcha buns recipe tips
Weigh your ingredients
Weighing your ingredients is important for getting the recipe perfect and getting consistent results. Not weighing your ingredients can lead to adding too much or too little of an ingredient. In a small batch recipe it is especially important to get those correct measurements because there is less room for error. If you haven’t already, I highly recommend purchasing a kitchen scale. This one is super cheap and worked well for me when I was starting out!
Kneading the dough
Kneading this dough will take a longer time than you are probably used to. This dough is enriched with eggs and butter which makes it take longer for the proper amount of gluten to develop. Kneading in the mixer can take me anywhere from 10-20 minutes. The dough is ready to be used when it passes the windowpane test and has pulled away from the sides and bottom of the bowl. If you are weighing your ingredients, just trust the process! If you are using cup measurements and the dough just is not coming together, try adding in 1 tbsp. of flour at a time.
Room temperature ingredients
It is important for the ingredients to be at room temperature so that they properly incorporate with each other. Take out the egg and butter at least 30 minutes and up to 1 hr 30 min. before starting the recipe. To bring an egg to room temperature quickly, you can place it under hot water for 1 minute. To bring butter to room temperature quickly, slice it, place it on a plate, and microwave it in 5 second intervals!
Heating the milk
Heating the milk is important for bringing the yeast to an optimal temperature for rising. The milk should be heated to ~100°F / 38°C but it does not have to be exact. As long as the milk is between 95°F – 110°F, it is good to be used. If the temperature exceeds 110°F, wait for it to cool down before using so that you do not kill the yeast!

Ingredients and substitutions
For the brioche buns:
All purpose flour: for structure and chewiness.
Active dry yeast: for making the dough rise. You can easily substitute in instant yeast if that is what you have on hand. You will just skip the step of combining the warm milk, sugar, and yeast!
Salt: for balancing and bringing out the sweetness of the brioche. Salt also “controls” the yeast to make sure that it does not overly expand.
Granulated sugar: for sweetening the brioche and for helping the yeast with rising. We will use a little bit of sugar in the brioche as well as in the hazelnut sugar.
Eggs: for binding and adding moisture.
Unsalted butter: for tenderizing the brioche rolls and giving them a buttery, melt-in-your-mouth feel. I would not recommend substituting in salted butter since salt is important to controlling yeast growth and the amount of salt in salted butter is quite variable.
Whole milk: for tenderizing and hydrating the dough. Whole milk will provide the softest rolls because the extra fat helps tenderize the dough. You can however swap in 1%, 2% or your favorite non dairy milk alternative! Just note that the dough may be a little less soft and fluffy due to the varying fat content.
For the matcha streusel:
Unsalted butter: the base of the streusel. You can use salted butter in place of unsalted.
All purpose flour: for building up structure and thickening the streusel.
Powdered sugar: for sweetening and thickening the streusel.
Matcha powder: the star of the streusel! Make sure you are using fine powdered matcha.
For the fresh strawberry whipped cream:
Heavy whipping cream: the base of the whipped cream.
Granulated sugar: for sweetening the whipped cream. You can easily increase or decrease how much you want to add based on your preferred sweetness level. You can also substitute in powdered sugar, I just find that granulated sugar doesn’t give that weird mouthfeel that powdered sugar sometimes likes to do!
Salt: for balancing and bringing out the sweetness and flavor of the whipped cream. Don’t be scared to add a pinch of salt!
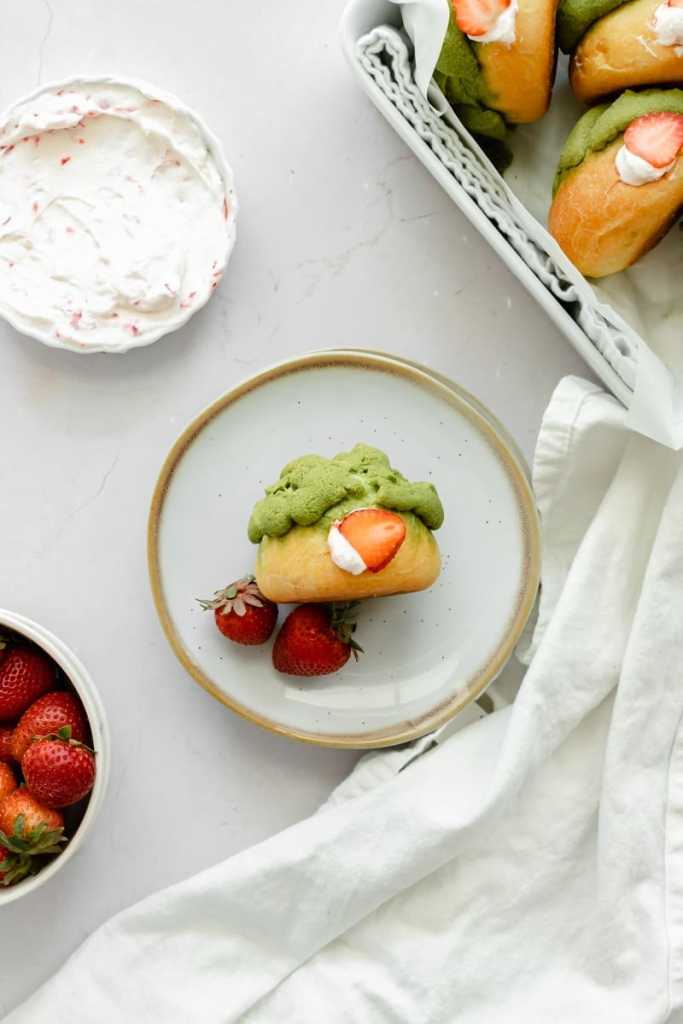
Strawberries: fresh strawberries make this whipped cream super fresh and delicious, and are a classic pairing to matcha.
How to make strawberry matcha buns
While making brioche might seem hard and scary, it’s really super easy and most of the time you are just waiting for the dough to rise!
1. Make the dough. Mix together the warm milk, sugar, and yeast and leave to rest until the mixture begins to foam. Then, combine all of the dough ingredients in a stand mixer and knead. You will know the dough is ready when it passes the windowpane test (more details later in the post!)
2. Let rise overnight. These buns are made using a brioche dough, meaning it’s been enriched with eggs, butter and milk (all the good stuff!) I recommend letting the dough rise in the fridge overnight so that it is easier to work with. However, you can certainly make this all in one day (more details later in the post!)
3. Shape the buns. I prefer to weigh the buns to make sure they are all the same size, but you can eyeball the dough if you would like. For 6 large buns, each dough ball weighed 50g.
4. Make the matcha topping. You can do this with a mixer, but if your butter is soft enough it’s super easy to do by hand. Just mix together all of the matcha topping ingredients until the mixture is cohesive and forms a ball. Then, divide the topping into 6 (~20g each), and flatten it with your palm until the diameter is large enough to cover the buns. Place the topping over the buns, then use a sharp knife or bread lame to score the topping into any pattern you would like!
5. Let the buns rise again. Let the buns rise at room temperature until they have doubled in size. This took 30 minutes for me as I kept them in a warm environment, but can take up to 1 hour.
6. Bake. Bake at 350°F / 175°C until the buns are golden brown. This took ~15 minutes for mine. If you want to check with a thermometer, the buns should reach an internal temperature of 190°F / 88°C.
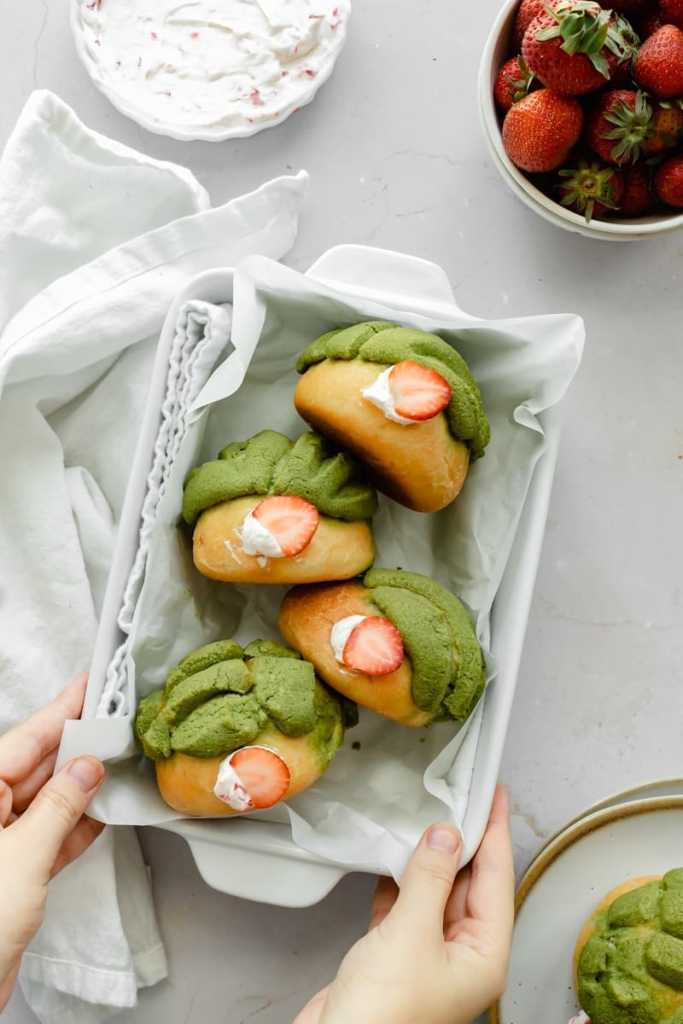
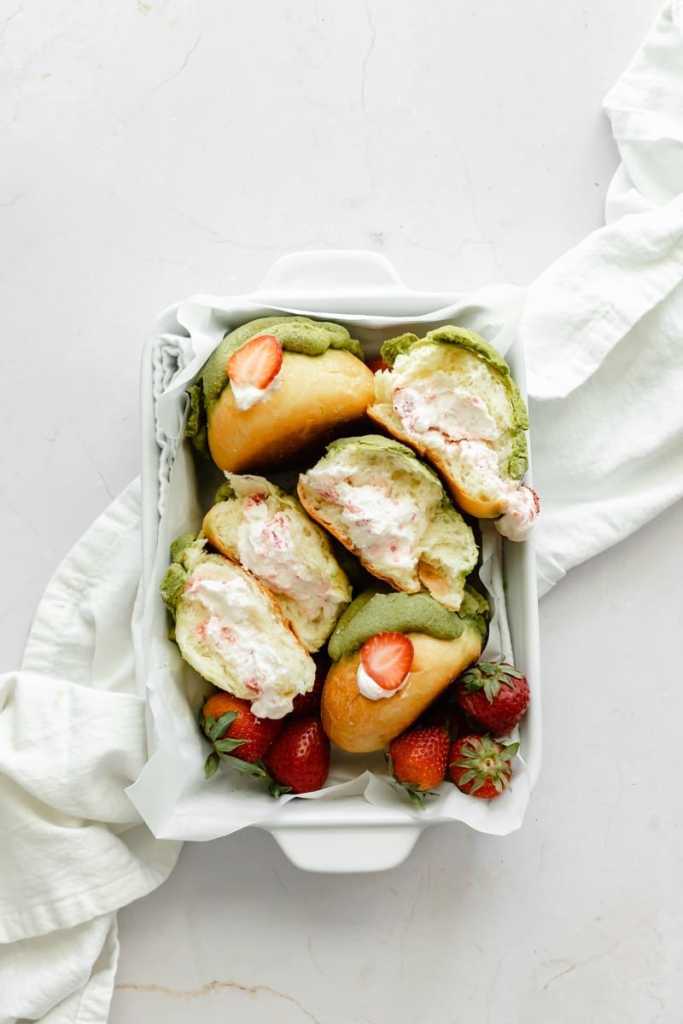
7. Make the strawberry whipped cream. The best part: FRESH strawberry whipped cream! Finely dice up your strawberries, beat the whipped cream ingredients together, then fold in the strawberries!
8. Fill the matcha buns. Poke a hole in the side of each matcha bun and fill them once they have cooled to room temperature.
9. Serve and enjoy! Serve the buns within 2 hours of filling them, or place them in the fridge to enjoy later!
How to fill strawberry matcha buns
I have found this method to be the easiest way to perfectly fill your donuts!
1. Use a knife to poke one side of the donut, into the center.
2. Place your filling into a piping bag, fitted with a medium sized round tip. (I used Wilton #10)
3. Insert the piping tip into the side of the donut, and fill! You can sort of feel that the buns have been adequately filled as it will give some resistance and push your hand upwards as they are filled.
The windowpane test
The windowpane test is (in my opinion) the best way to tell that your dough has been properly kneaded. Once the dough starts to pull away from the sides and the bottom of the mixing bowl, it is most likely ready. However, just to be sure that it’s good to go I check if it passes the windowpane test. To do that, take some of the dough in your hands and start to slowly stretch it out. If it can get thin enough to where light passes through it before tearing, then it’s good to go! If not, keep kneading until it does!
How to store strawberry matcha buns
Is there anything better than fresh brioche? These will taste their best on the day that they are baked. If you are not going to eat them right away, I highly recommend not filling them until you are ready to eat. The whipped cream needs to be stored in the fridge as it can not be out for more than 2 hours without becoming unsafe to eat.
Strawberry Matcha Buns Q & A
Can I double this recipe?
Yes! I can’t emphasize using a kitchen scale enough for especially this recipe already, but if you are going to double or half the ingredients it is even more important that you weigh your ingredients. The dough is very hydrated and slight alterations can change the texture of the dough.
Can I use instant yeast instead of active dry yeast?
Yes of course! Instead of mixing the heated milk, sugar, and yeast together, just pop all of the dough ingredients into your mixing bowl to start kneading. I do highly recommend refrigerating the dough overnight to make it easier to work with and more flavorful. However, if you are making the recipe all in one day, and using instant yeast, simply let the dough rest for just 10 minutes before shaping the rolls. After shaping the rolls and adding on the matcha streusel, let the buns rise until they are doubled in size and then bake!
Can I make the dough ahead of time?
Yes, and I highly recommend it! Brioche dough is a very enriched dough that can be hard to work with when warm. Simply knead the dough together, cover it, and leave it to rise in the fridge overnight. When you are ready to make the buns, simply take the dough of the fridge and proceed with the recipe.
My yeast mixture isn’t foaming, what should I do?
The mixture should start foaming around 5 minutes in. If it has not foamed after 10 minutes, the yeast is likely dead. You want to make sure that the milk temperature does not exceed 110°F / 43°C or it will kill the yeast. If you try it again and it still does not foam, the yeast you are using may be expired and you will want to purchase some more before proceeding.
Why do you measure in grams?
My recipes are all written in grams because it is a more accurate way to bake. When you use a kitchen scale, you ensure that your baked goods turn out as close to the written recipe as possible. Plus, the cleanup is way easier when using a scale! I will provide standard cup measurements but please note that I have not tested the recipe using cup measurements. Here is my favorite kitchen scale, and here’s an article about why I use a kitchen scale, and why you should too!
Tools and ingredients
Cookie Sheet: I absolutely love USA pan products because of their great quality. I use their cookie sheet which is always the perfect size for all of my small batch recipes!
Silicone baking mat: parchment paper will always do the job, but I like to use a silicone mat when I can to try to cut down on waste. This is the one I use.
Piping bags: these bags are super sturdy, I love them!
Wilton #10 piping tip: This size works perfectly for filling the buns. I recommend using a piping tip as it makes it easier to fill them!
For a full list of tools, equipment and ingredients that I use and love, you can check out this page here.
Did you make these strawberry matcha buns?
If you made these strawberry matcha buns I would love to see them and know your thoughts! Please leave a comment and review down below, and tag me on Instagram @freshbeanbakery. If you have any questions about the recipe I will gladly do my best to answer them in the comments below!

Strawberry Matcha Buns
Ingredients
Brioche
- 60 g whole milk (¼ c.)
- 1 tsp. active dry yeast
- 1 tbsp. granulated sugar
- 160 g all purpose flour (1 ⅓ c.)
- ½ tsp. salt
- 1 egg room temperature
- 42 g unsalted butter room temperature (3 tbsp.)
Matcha Streusel
- 42 g unsalted butter room temperature (3 tbsp.)
- 40 g all purpose flour (⅓ c.)
- 40 g powdered sugar (⅓ c.)
- 1 ½ tsp. matcha powder
Strawberry Whipped Cream
- 180 g heavy whipping cream (¾ c.)
- 50 g granulated sugar (¼ c.)
- ⅛ tsp. salt
- 80 g finely diced strawberries (½ c.)
Instructions
Brioche
- In a microwave safe measuring cup, heat the milk to 100°F / 38°C. Whisk in the yeast and the sugar. Set aside until the mixture begins to foam. (~5 minutes)
- While waiting, add the flour, salt, egg, and butter to the bowl of a stand mixer fitted with the dough hook attachment. When the yeast mixture begins to foam, add it in to the rest of the ingredients.
- Knead the dough on low speed for 1 minute to allow the ingredients to come together. Increase the speed to medium-high and knead for an additional 15 minutes, or until the dough passes the windowpane test. (This will happen after the dough has cleaned the sides and bottom of the bowl)
- At this point I would recommend covering the bowl with plastic wrap and leaving it to rise overnight in the fridge. If making the buns in one day, cover the bowl with a towel and leave it to rise in a warm environment until doubled in size (~1 hr.)
- Once the dough has doubled in size (or after taking it out of the fridge after rising overnight), lightly punch it down to remove excess air.
- Portion the brioche into 6 equally sized pieces (50g each), and roll them tightly into a ball. Place them spaced out on a baking tray lined with parchment paper.
Matcha Streusel
- In a small bowl, mix the butter until it is smooth. Add in the flour, powdered sugar, and matcha powder. Stir the mixture together, slightly kneading together if needed, until it forms a ball.
- Divide the streusel into 6 equally sized pieces (20g each), and roll each piece into a ball. Flatten each piece in the palms of your hand until it is just big enough to cover the top and slightly hangs over the sides of the brioche buns.
- Place each streusel on the buns, then use a knife or bread lame to score the tops of each bun into your desired design. Be careful to not cut too deep or you will cut open the buns!
- Let the buns rise until doubled in size (~30 min.)
- Preheat the oven to 350°F / 175°C. Bake the buns for 15 minutes, or until they are golden brown on the sides.
Strawberry Whipped Cream
- Wash and finely dice the strawberries, so that they are small enough to fit through the piping tip that you will use to fill the matcha buns.
- In a medium sized bowl, beat together the heavy whipping cream, sugar, and salt until stiff peaks form.
- Lightly fold in the fresh strawberries until they are evenly distributed throughout the whipped cream.
Filling
- Once the matcha buns have cooled to room temperature, use a sharp knife to poke a hole in the side of each of the buns. Transfer the strawberry whipped cream into a piping bag fitted with a large round tip, and fill each of the buns.
- Serve and enjoy!