
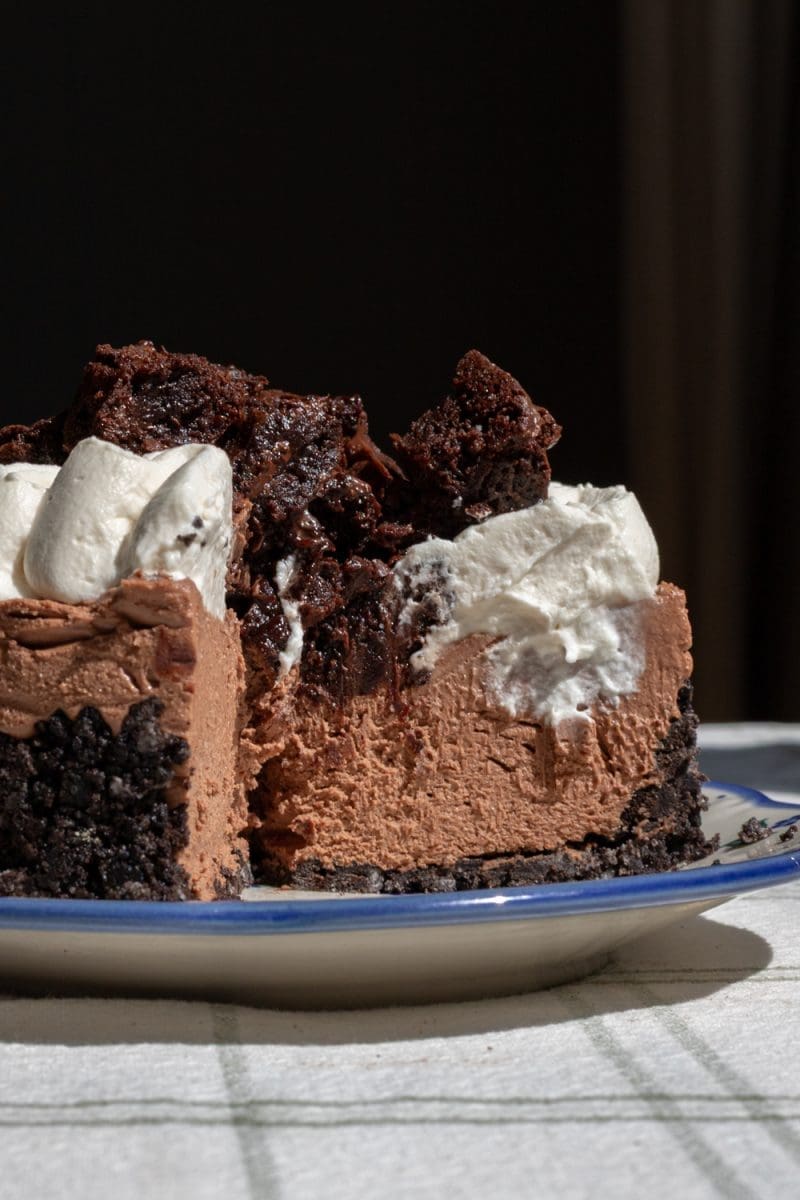
A rich and creamy mini 6-inch no-bake chocolate cheesecake with an oreo crust and vanilla bean whipped cream.
This post may contain affiliate links, please read the privacy policy for details.

mini no-bake chocolate cheesecake
Hello hello! It’s the middle of summer which means it is way too hot outside to turn on the oven. Thankfully, no-bake desserts exist, and today I have for you this delicious mini no-bake chocolate cheesecake. And I know a lot of recipes will say no-bake and then you have to bake the crust for a short amount of time – but there is absolutely *no* baking involved here.
It starts with a chocolate oreo crust that we’ll freeze while we make the filling to allow it to set. Then, we’ll make a super easy, rich and creamy chocolate cheesecake that requires no eggs, and no baking. Allow that all to set in the fridge for at least 4 hours, then we’ll top it off with a super simple and delicious vanilla bean whipped cream. So let’s get into it! 🙂
why you’ll this love mini no-bake chocolate cheesecake:
- Oreo crust – I meaaann who doesn’t like oreos. Plus, using an oreo crust means you can easily switch out the flavor for any chocolate oreo.
- It’s super rich and creamy – the cream cheese and heavy cream create the *creamiest* cheesecake.
- It’s mini! – of course, that’s what you’re here for so I hope it’s a plus! 🙂
expert baking tips
Weigh your ingredients:
My recipes are all written in grams because it is the most accurate way to bake. When you use a kitchen scale, you ensure that your baked goods turn out as close to the written recipe as possible. Plus, the cleanup is way easier when using a scale! I will provide standard cup measurements but please note that I have not tested the recipe using cup measurements and therefore can not guarantee your recipe will come out how mine did. Here is my favorite kitchen scale.
Use room temperature ingredients:
It’s super important for the cream cheese to be room temperature so that it incorporates smoothly with the rest of the ingredients. Take out your cream cheese and sour cream at least an hour before you want to make the cheesecake filling.

ingredients for mini no-bake chocolate cheesecake:
oreo crust:
- Unsalted butter: salted or your favorite non-dairy butter stick will work perfectly here as well.
- Oreos: use your favorite flavor of chocolate oreos here – I went with java chip.
No-bake chocolate cheesecake:
- Cream cheese: the base of the cheesecake and what makes it tangy, rich, and creamy. I recommend full fat cream cheese for the best texture.
- Granulated sugar: for sweetness.
- Chocolate: you’ll want to use a semi-sweet or dark chocolate baking bar here for the best flavor. I do not recommend using chocolate chips here since they have added stabilizers that take away from making the cheesecake smooth and from the flavor. Be sure to use a quality chocolate bar that you love since (almost) all of the chocolate flavor comes from here!
- Cocoa powder: we’ll just need 1 tbsp. of cocoa powder to help thicken up the cheesecake a little and to add more chocolate flavor. I recommend dutch-process cocoa powder, but natural cocoa powder or black cocoa powder will work just as well.
- Vanilla: for flavor.
- Heavy whipping cream: for making the cheesecake light and creamy.
Vanilla bean whipped cream:
- Heavy whipping cream: the base of the whipped cream.
- Granulated sugar: just a little bit for sweetness.
- Salt: to help bring out the flavor.
- Vanilla bean paste: for flavor – vanilla extract will also work perfectly here.
how to make a mini no-bake chocolate cheesecake
Here are some shots of making this cheesecake. You can find the full recipe at the end of this blog post!


- Melt the chocolate, then mix in the sugar and cocoa powder.
- Make the oreo crust.


- Add the cream cheese and salt into the chocolate mixture, and beat until well combined. Then, beat in the heavy whipping cream and vanilla.
- Pour the cheesecake over the crust, cover it, and set it in the fridge to chill. Serve with vanilla bean whipped cream and enjoy!
mini no-bake chocolate cheesecake
recipe q&a
what size cake pan do I need?
You’ll need a 6″ springform pan for this cheesecake. You can use a 7″ springform, just note that your cheesecake will be thinner. I wouldn’t recommend using a non-springform cake pan because it will be quite difficult to remove the cheesecake from the pan once it’s all set. You could also use a loaf pan here – just be sure to line the loaf pan with a ‘hammock’ of parchment paper so you can lift the cheesecake out of the pan once it has set.
How should I store cheesecake?
The cheesecake should be out at room temperature for no more than 2 hours. Keep the cheesecake covered and stored in the fridge, where it will keep well for up to 7 days.
cheesecake toppings
I went very classic with the topping by making a chocolate whipped cream – but this chocolate cheesecake is the perfect blank canvas for any of your favorite toppings. You could do a ganache, an espresso whipped cream, fresh strawberries, etc.

tools and ingredients:
You can find all my favorite tools and ingredients that I use on my Amazon Storefront page, here!
other recipes you might enjoy:
did you make this recipe?
I’d love to see and know your thoughts! please leave a comment and review below, and tag me on instagram @freshbeanbakery. #freshbeanbakery
Mini No-Bake Chocolate Cheesecake
Ingredients
Oreo Crust
- 12 oreo cookies (135g)
- 35 g unsalted butter (2 ½ tbsp.)
No-Bake Chocolate Cheesecake
- 113 g semi-sweet or dark chocolate baking bar (⅔ c.)
- 1 tbsp. dutch process cocoa powder
- 100 g granulated sugar (½ c.)
- 226 g cream cheese room temperature (8 oz.)
- ⅛ tsp. salt
- 1 tsp. vanilla
- 180 g heavy whipping cream (6 ½ oz.)
Vanilla Bean Whipped Cream
- 150 g heavy whipping cream (⅔ c.)
- ⅛ tsp. salt
- 2 tbsp. granulated sugar
- 1 ½ tsp. vanilla bean paste
Instructions
No-Bake Chocolate Cheesecake
- Break up the chocolate bar into small pieces and place it into a microwave safe bowl. Melt the chocolate in 30-second intervals, stirring after each interval, until it's melted and smooth.
- Mix the cocoa powder and sugar into the chocolate, then set it aside. In the meantime, make the oreo crust.
Oreo Crust
- Line your springform pan. Start by placing a small sheet of parchment paper at the bottom of the pan while it's unassembled, then snap it together to seal in the parchment. Then, coat the sides of the pan with butter and line it with a strip of parchment paper.
- Add the oreos (with the filling) and the butter to a food processor. Pulse the mixture until you are left with only tiny oreo crumbs. [Alternatively, crush the oreos super finely in a large ziploc bag, then stir in the melted butter.]
- Press the mixture into the bottom and slightly up the sides of your prepared pan. Set the pan in the freezer while you finish making the chocolate cheesecake filing.
- Add the cream cheese and salt into the chocolate mixture. Use a hand or stand mixer to beat the mixture on medium speed for 2-3 minutes, until the mixture is fluffy and smooth.
- Add in the heavy whipping cream and vanilla and beat the mixture for 1-2 minutes, until it thickens.
- Take the springform pan out of the freezer and pour the chocolate cheesecake batter over the crust, smoothing it into an even layer.
- Cover the pan with plastic wrap and place it in the fridge for at least 4 hours to firm up.
Vanilla Bean Whipped Cream
- (Hold off on this step until you're ready to serve the cheesecake) Add the heavy whipping cream, salt, sugar, and vanilla to a large mixing bowl. Beat the cream with a hand or stand mixer fitted with the whisk attachment until the mixture reaches soft peaks.
- Pile the whipped cream on to the cheesecake*, then slice, serve, and enjoy!
Notes
Nutrition
Please note that the nutrition information is only an estimate and may vary based on different brands of ingredients and any substitutions made.


This cheesecake came out so rich and delicious! Luckily my family and friends have a deep chocolate sweet tooth. 🙂 also fyi, the recipe card says to use 223 g of cream cheese but then lists 12 oz – I used just 223 g which is 8 oz and it came out perfectly.
Thank you so much Nancy, I’m so happy you liked it! 🙂 And you’re completely right – my original test used 12 oz. instead of 8 oz. so that slipped by – I’ve fixed it now!